Live streaming pre-recorded videos on Facebook offers a unique way to engage audiences. This method allows creators to broadcast content as if it were happening in real-time, enhancing interaction with viewers. Using streaming software like Castr, users can upload pre-recorded video files and stream them live on their Facebook page. This allows users to leverage live video to enhance engagement and reach. This approach is ideal for those who want to schedule a live event without the pressure of being live in real-time.
Castr directly integrates with Facebook, allowing users to stream pre-recorded videos with just a few clicks. Our pre-recorded streaming service also supports streaming on multiple platforms.
In this blog post, I’ll show you how to livestream pre-recorded videos on Facebook.
How To Stream Live On a Facebook Page From a Desktop Using Pre-Recorded Videos:
The first thing you need is the “Stream Key” from your Facebook page. This is a unique key that every page has. It enables us to use the streaming software we need.
Here is how you can get it:
- Go to your Facebook page and click on Publishing Tools > Video Library > +Live.

You will see a pop-up. Copy the “Stream Key”.

As per Facebook: Keep the Stream Key a secret. Anyone can use them to stream videos to their post. This stream key is valid for seven days. Once you preview the video, you have up to 5 hours to go live. If you need more time, create a new stream key.
- Click on Next. You will see the “Create Live Video” screen as shown below.

Do not close this window. After we configure the streaming software, we will use the screen above to go LIVE.
Configuring Open Broadcaster Software (OBS) For Streaming Pre-Recorded Videos As ‘Live’ Video On Facebook:
- Download and install Open Broadcaster Software (OBS) for your computer’s OS.
- Open the OBS application.
- Click on Settings > Stream and then paste the stream key in the Stream key field.
- Click on OK.

Now, click on the + icon in the Sources field and select VLC Video Source.

Now, we need to create a playlist. This playlist can consist of one video or multiple videos. It depends entirely on your goal. For this tutorial, I’m streaming only one video.
- Give a name to the playlist and click OK.
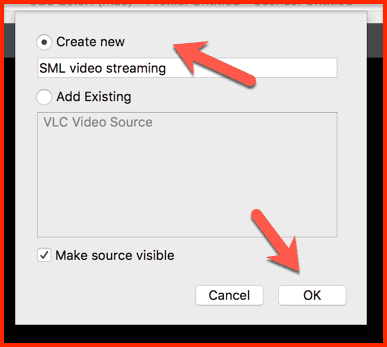
On the next screen, you should configure how you want the stream to happen. For example, live streaming should work only when the software is running in the foreground, or you can set it to stream even when the software is minimized.
In my case, I’m letting it stream even after the video is minimized by using the option “Always play even when not visible”.
You can add as many videos as you like by clicking the “+” icon.

- Click on OK to add this video to your streaming list.
- Mute the Mic/Aux.
- Click on Start Streaming.

- Now, go back to the Facebook window and click on GO LIVE.

If you have followed all the steps mentioned above, you will see a screen like this:

You should test this first as a trial video to get a feel for how OBS and this whole” re-recorded live streaming” concept work.
However, there are a couple of issues that you may face:
- You need to end the live stream manually. If not, the stream will continue in a loop.
- Streaming video from the 0.00-second mark on Facebook: You can overcome this by configuring the streaming delay in OBS‘s Advanced settings.

OBS is indeed one of the best free solutions for live streaming pre-recorded videos. Many other solutions offer advanced features that could be better for any digital marketing company acting on behalf of a client.
Here are some popular (paid) solutions:
- Ecamm Live (free trial, then a one-time purchase of $79)
- Onestream. live
For a blogger or startup that is looking for a free solution, OBS is the best bet.
Go ahead and stream some of your existing videos on your Facebook page. It may take 2-3 times before you get the whole process right, but if you follow these instructions, you should have no problem.
After you try, come back and let me know how it goes. I look forward to hearing about your experience!


